![wicked logo.webp]](https://help.wickedreports.com/hs-fs/hubfs/wicked%20logo.webp?height=40&name=wicked%20logo.webp)
What Is Customer Explorer?
While reports such as Pulse and Attribution Report aggregate performance to help you understand what's happening across your business and marketing, Customer Explorer gives you access to the underlying records.
Use Customer Explorer when you want to:
- Verify tracking — Confirm that clicks are arriving with the expected source, campaign, and UTM information.
- Look up a customer — Find a specific customer and see the marketing journey that led to their purchases.
- Audit an order — See the customer's first click, the last click before the order, and how long their journey took.
- Investigate attribution — See the actual clicks that represented important points in a customer's journey.
- Export data — Download filtered contacts, orders, or clicks for offline analysis.
Think of Customer Explorer as the place to go when you want to move from an aggregate marketing result to the individual records behind it.
Getting to Customer Explorer
Select Customer Explorer from the left navigation.
The page is organized into three data types:
- Contacts — One row per person or lead.
- Orders — One row per purchase.
- Clicks — One row per tracked marketing click.
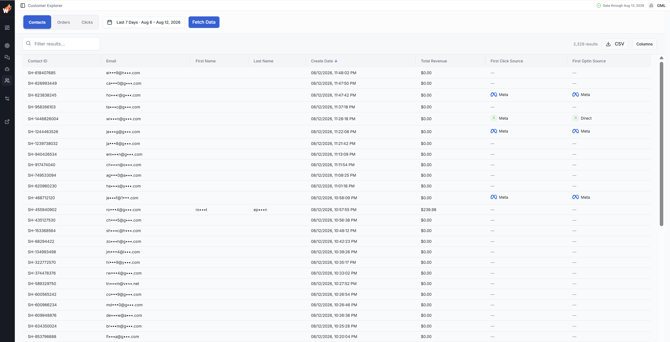
Switching Between Contacts, Orders, and Clicks
Select Contacts, Orders, or Clicks to change the type of data displayed.
When you select a date range and fetch data, Wicked Reports loads all three datasets. The tab you're currently viewing loads first, while the other two load in the background.
Once loaded, you can move between tabs without fetching the data again.
Each tab also maintains its own filters. For example, a filter you've applied to Contacts does not affect Orders or Clicks.
Switching tabs returns that tab to page 1 and applies its appropriate default sorting.
Selecting a Date Range
Use the date picker to choose the period you want to explore.
Available presets include:
- Yesterday
- Last 7 Days
- Last 14 Days
- Last 30 Days
- Week to Date
- Month to Date
- Quarter to Date
- Year to Date
- Custom Range
For a Custom Range, select your start and end dates from the calendar and confirm the selected range.
The date control displays both the preset and the actual dates being analyzed.
For example:
Last 7 Days · Aug 6 – Aug 12, 2026
Why Doesn't the Date Range Include Today?
Customer Explorer date ranges end at yesterday because today's data is still being collected and processed.
Fetching Data
After choosing a date range, select Fetch Data to load the data for that period.
Changing the date range by itself does not fetch new data.
The workflow is:
Choose a date range → Confirm the range → Select Fetch Data
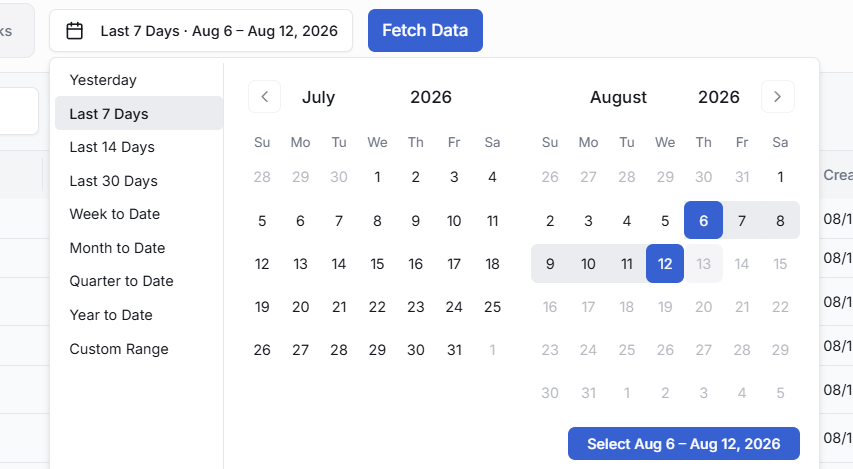

The first time you open Customer Explorer, the page automatically loads its initial data.
When fetching a new range, the button displays Fetching…
During this process, the result count displays:
+ still loading…
Large date ranges and high-volume accounts can take longer to finish loading. This is normal.
How the Date Range Works
The selected date range applies to the event represented by the tab you're viewing.
That means:
| Tab | Date Being Filtered |
|---|---|
| Contacts | Contact Create Date |
| Orders | Order Date |
| Clicks | Click Date |
This distinction is important when searching for a customer.
For example, a customer who was created six months ago but placed an order yesterday will not appear on the Contacts tab when viewing yesterday. Their contact was created six months ago.
Their order, however, will appear on the Orders tab for yesterday.
Filtering Your Data
Filtering is one of the most powerful features of Customer Explorer.
Rather than searching every field at once, Customer Explorer lets you specify what you're looking for and which field you want to search.
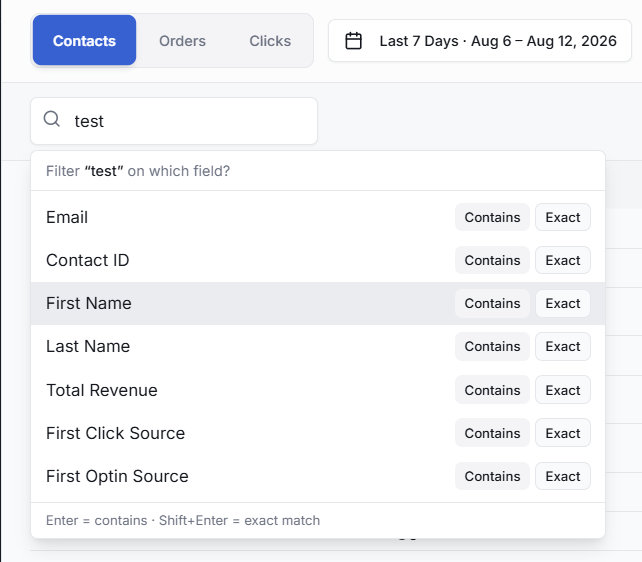
Adding a Filter
To add a filter:
- Type the value you want to find.
- Customer Explorer asks, "Filter '[your text]' on which field?"
- Find the field you want to search.
- Choose Contains or Exact.
For example, type:
gmail.com
Then choose:
Email → Contains
The filter becomes a chip:
Email contains gmail.com
Contains vs. Exact
Use Contains when the value can appear anywhere within the field.
For example:
Email contains gmail.com
could return any email address containing gmail.com.
Use Exact when you want the entire displayed field value to match.
For example:
Order Total exact 100
can match a displayed order total of $100.00.
Matching is case-insensitive.
Using Multiple Filters
You can apply multiple filters at the same time.
Multiple filter chips use AND (ALL) logic.
That means a row must satisfy every filter to appear.
For example:
Source contains Meta
AND
Campaign contains spring-sale
returns only rows that satisfy both conditions.
Adding or removing a filter returns the table to page 1.
Editing a Filter
Select an existing filter chip to edit it.

The original filter remains active until you confirm the replacement.
Removing Filters
Select the × on a filter chip to remove that individual filter.
Select Clear all to remove all active filters.
Filter Keyboard Shortcuts
You can also work with the filter menu using your keyboard.
| Shortcut | Action |
|---|---|
| ↑ / ↓ | Move through available fields |
| Enter | Apply Contains to the highlighted field |
| Shift + Enter | Apply Exact to the highlighted field |
| Esc | Cancel |
Smart Channel Matching
Customer Explorer recognizes common names for the same marketing channels.
For example, filtering a source or channel field for Meta can also find values associated with:
- FB
- Facebook Ads
Other recognized equivalents include:
- Google ↔ Google Ads / AdWords
- Bing ↔ Microsoft
- SMS ↔ Text
- TikTok ↔ Tik Tok
This helps you find related traffic even when historical tracking used different naming conventions.
Paid vs. Broad Channel Searches
Some terms intentionally behave differently.
A broad search such as Google can include paid Google traffic.
A paid-specific term such as Adwords, however, does not include organic Google traffic.
This prevents a paid-only search from unexpectedly returning organic activity.
Dates, Numbers, and Currency Filters
Filters match the values as they're displayed in Customer Explorer.
For example:
100 Exact
can match:
$100.00
Date fields such as Create Date, Order Date, and Click Date aren't available as filter fields.
Use the Date Range control to determine which dates are included.
Working With the Results Table
The results table can be sorted, resized, customized, and paginated.
Sorting
Select a column header to sort by that field.
The arrow beside the column name shows the current sort direction.
Select the column again to reverse the order.
Resizing Columns
Drag the thin divider on the right side of a column header to change its width.
Choosing Columns
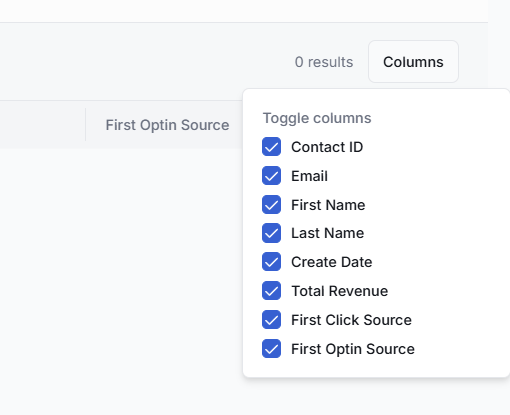
Select Columns to choose which fields appear in the table.
Each tab has its own available columns.
Result Count
The result count shows the number of records matching your current filters.
While data is still loading, you'll see + still loading… to indicate that additional records may still appear.
Paging Through Results
Use the controls at the bottom of the table to move through larger result sets.
Rows per page can be set to:
- 25
- 50
- 100
The default is 50.
The footer also displays:
Showing X–Y of Z
Use the first, previous, next, and last-page controls to navigate.
You can also type a page number into the page field and press Enter.
The footer remains visible while you scroll through the table.
Contact Columns
The Contacts tab shows one row for each contact created during the selected date range.
| Column | What It Means |
|---|---|
| Contact ID | The unique Wicked Reports identifier for the contact. |
| The contact's email address. | |
| First Name | The contact's first name, when available. |
| Last Name | The contact's last name, when available. |
| Create Date | When the contact first entered the account. |
| Total Revenue | The contact's lifetime value, using net order amounts after adjustments such as discounts and refunds. |
| First Click Source | The channel and utm_source of the contact's very first tracked marketing click. |
| First Optin Source | The channel and utm_source of the last tracked click before the contact's first opt-in. |
Click a Contacts row to open that person's Contact Details.
Order Columns
The Orders tab shows one row for each order during the selected date range.
| Column | What It Means |
|---|---|
| Order ID | The unique identifier for the order. |
| Order Total | The value of the order. |
| The email address associated with the order. | |
| Order Date | When the order occurred. |
| First Click Source | The channel and utm_source from the customer's first-ever tracked click. |
| Last Click Source | The channel and utm_source from the customer's last tracked click before this order. |
| Days Since 1st Click | The time between the customer's first tracked click and the order. Displays Same Day when applicable. |
Click an Orders row to open that customer's Contact Details.
Customer Explorer automatically moves the journey timeline to the selected order and highlights it, making it easy to investigate the events surrounding that purchase.
Click Columns
The Clicks tab shows individual tracked marketing clicks.
| Column | What It Means |
|---|---|
| Click Date | When the click occurred. |
| The email associated with the click, when known. | |
| Tracking URL | The URL associated with the tracked click. |
| Source | The click's utm_source. |
| Medium | The click's utm_medium. |
| Campaign | The click's utm_campaign. |
| Content | The click's utm_content. |
| Term | The click's utm_term. |
| Wicked Source | The Wicked Reports source value associated with the click. |
| Wicked ID | The Wicked Reports identifier associated with the click. |
Select a Tracking URL to open it in a new browser tab.
Hover over the link to view the complete URL.
Clicks rows themselves do not open Contact Details.
Understanding Channel Values
Channel cells display both the channel icon and the raw utm_source associated with the touchpoint.
A blank channel does not mean the associated order or customer is missing. It means Wicked Reports did not receive tracking information for that particular touchpoint.
If you see repeated blank channels, review your marketing links and tracking configuration to make sure the expected UTMs are being passed.
Exporting to CSV
Select CSV to export the data you're currently analyzing.

The export includes:
- The current tab
- Your active filters
- Your current sort
- Your currently visible columns
- The entire matching result set
The CSV is not limited to the rows on your current page.
For example, if your filters return 2,000 Orders but your table displays 50 rows per page, the CSV includes all 2,000 matching orders.
Files use the naming format:
wicked-[tab]-[date].csv
This is useful when you need to perform additional analysis or share a specific set of records outside Wicked Reports.
Contact Details
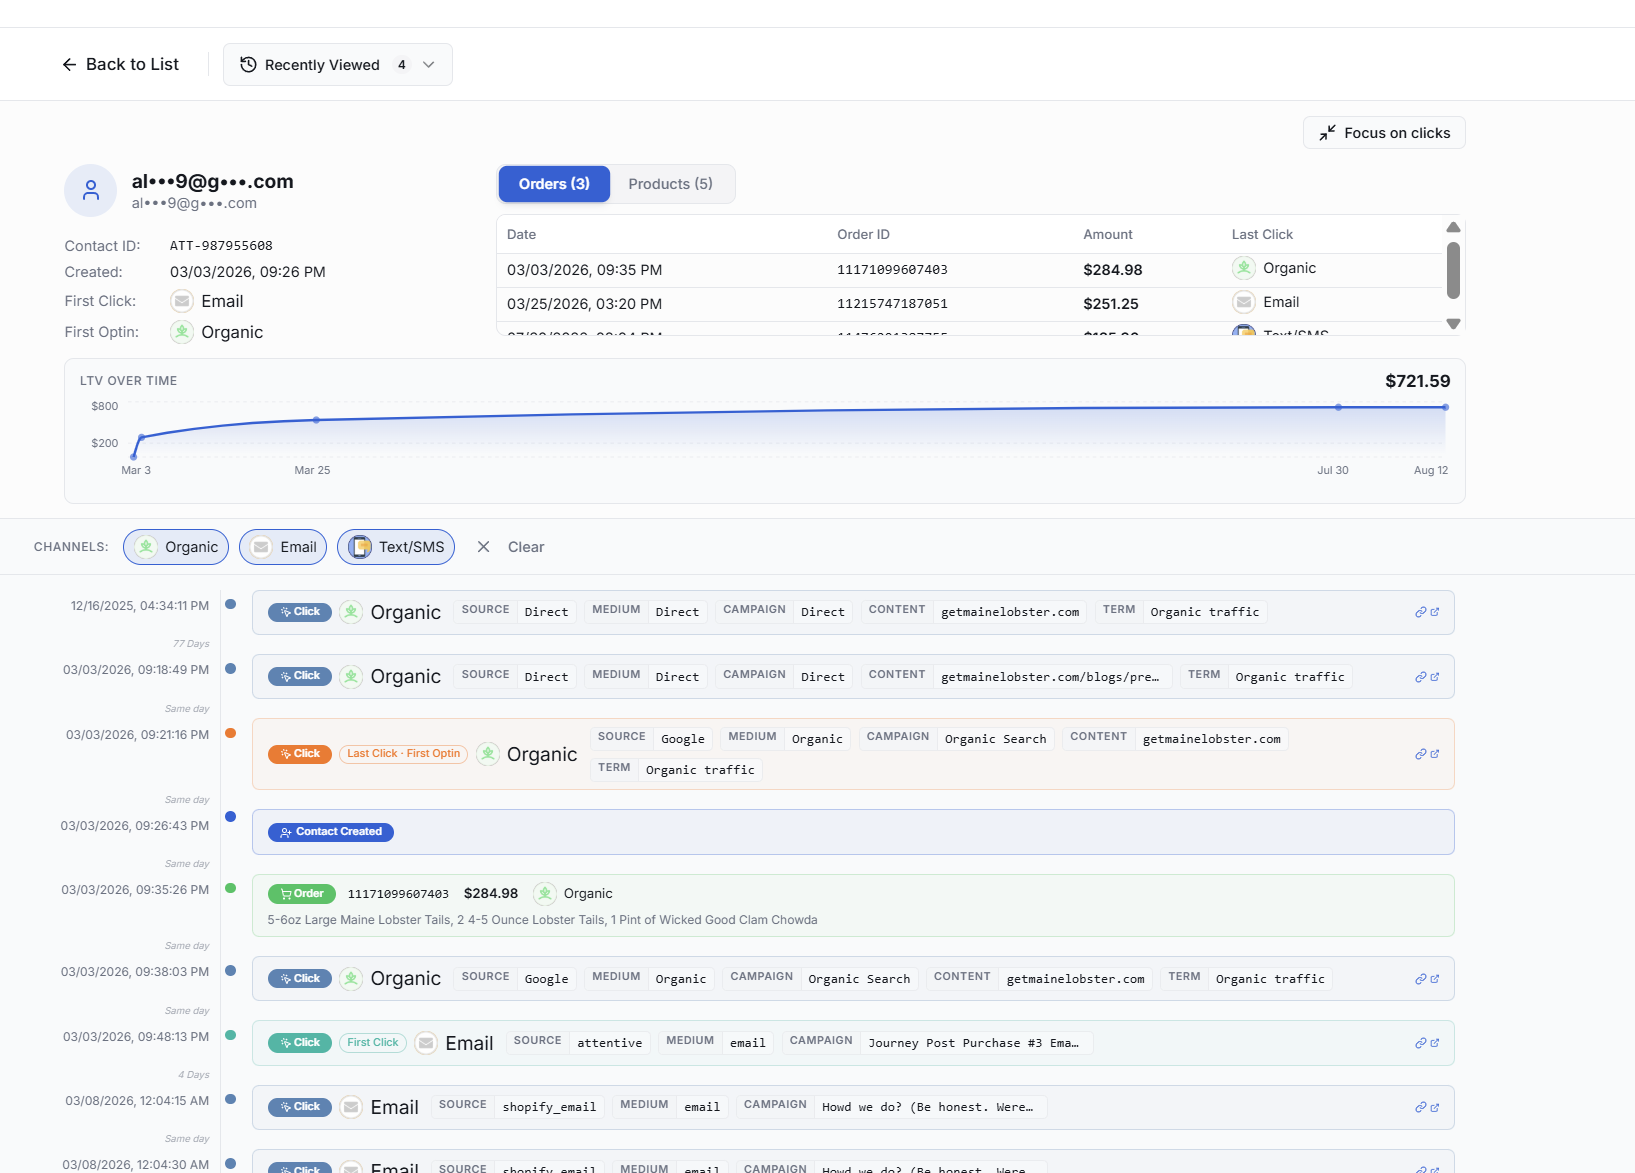
Contact Details lets you investigate the complete history Wicked Reports has for an individual contact.
Open Contact Details by selecting a row from:
- Contacts
- Orders
You can also reach Contact Details from customer, lead, and sales details available elsewhere in Wicked Reports.
Returning to Customer Explorer
Select Back to List to return to Customer Explorer.
Your previous:
- Date range
- Filters
- Sort
- Page
are preserved, allowing you to continue exactly where you left off.
Contact Information
The top of Contact Details identifies the customer and provides a summary of their history.
Information can include:
- Name
- Contact ID
- Created date
- First Click
- First Optin
- LTV
When a name isn't available, the customer's email is used instead.
First Click
First Click identifies the customer's very first marketing click ever tracked by Wicked Reports.
This is a historical point in the customer's journey and does not change based on the attribution model you're currently using.
First Optin
First Optin identifies the last tracked marketing click before the contact first opted in and became a lead.
Like First Click, this represents an actual historical point in the customer's journey.
Orders
Select Orders in the Contact Details header to see the customer's purchases.
The number beside Orders shows how many orders are available.
The table includes:
- Date
- Order ID
- Amount
- Last Click
Select an order to move directly to that purchase in the journey timeline.
The corresponding timeline event briefly highlights so you can quickly locate it.
Order Amounts Are Net
Order amounts shown in Contact Details are net amounts.
Wicked Reports removes applicable:
- Discounts
- Refunds
- Credits
- Chargebacks
- Cancellations
- Returns
Because of this, an order amount in Customer Explorer may be lower than the original gross order total shown in your ecommerce platform.
Products
Select Products to see product information associated with the customer's orders.
When available, this shows every product purchased across those orders and the product price associated with that specific order.
Why Don't I See Product Information?
Product data is only available when Wicked Reports receives it from your ecommerce integration or through data sent to Wicked Reports.
Not every integration provides product-level information.
If Products is empty or unavailable for a customer, it does not necessarily mean the order itself is missing.
Lifetime Value
The LTV badge shows the contact's lifetime value based on the order data Wicked Reports has received.
LTV uses net order amounts, accounting for adjustments such as discounts and refunds.
This gives you a better representation of the customer's actual value rather than simply adding together original gross order totals.
LTV Over Time
The LTV chart shows how the customer's cumulative value developed over time.
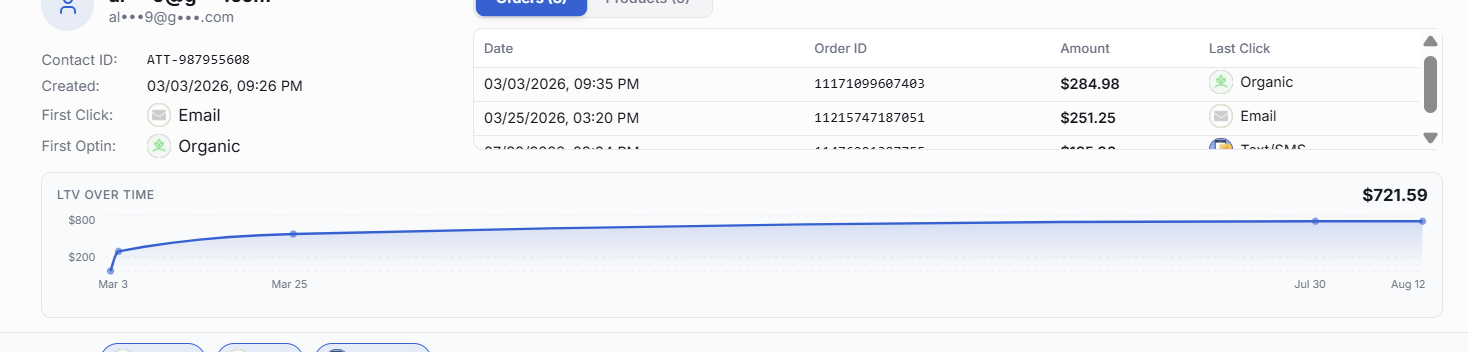
The chart begins at zero immediately before the customer's first purchase and accumulates value as additional orders occur.
It continues through yesterday.
If all of the customer's purchase activity occurred on one day, the chart displays a single point rather than creating a misleading trend line.
Focus on Clicks
Select Focus on clicks when you want more screen space for investigating the customer's marketing journey.
This collapses the Contact Details header into a compact summary showing:
- Name
- First Click
- First Optin
- LTV
Select Show details to expand the full header again.
This is particularly useful for customers with longer marketing journeys.
Reading the Customer Journey
The journey timeline shows the known history of the contact in chronological order.
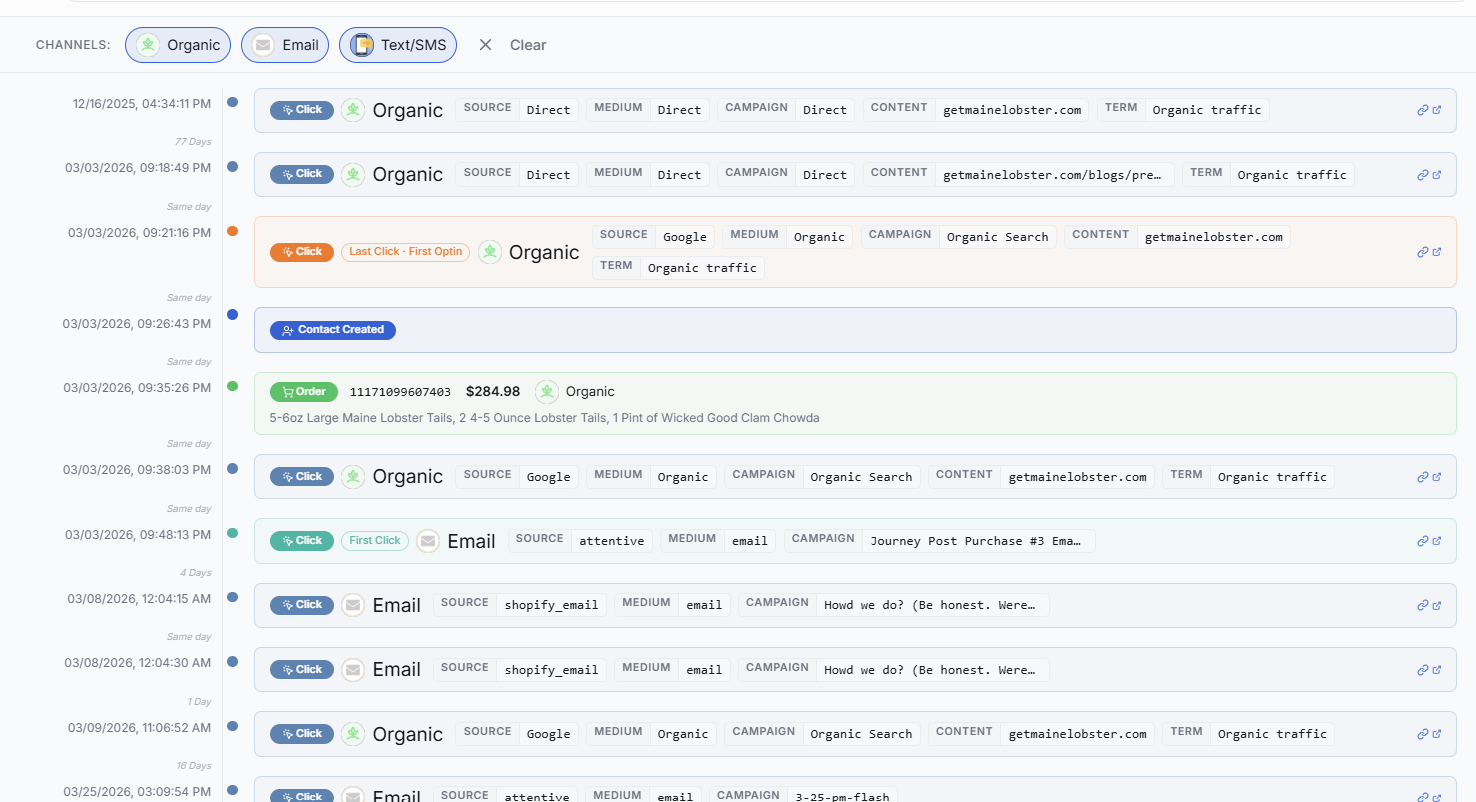
Each event includes its date and time in your account's configured timezone.
The timeline can include four primary types of events:
Contact Created
Shows when the person first entered your account.
Click
Represents a tracked marketing click.
Click cards can display:
- Channel
- Source
- Medium
- Campaign
- Content
- Term
Only the UTM information available for that click is displayed.
Long values are shortened on the card. Hover over them to see the complete value.
Order
Represents a customer purchase.
Order events display the order amount and available product information.
Custom Conversion
Represents a custom conversion passed into Wicked Reports
Understanding Journey Attribution Labels
Certain clicks receive additional labels showing the role that click played in the customer's historical journey.
These can include:
First Click
The customer's first-ever marketing click tracked by Wicked Reports.
Last Click
The last marketing click Wicked Reports tracked before a purchase.
Because a customer can make multiple purchases, different clicks throughout the timeline can be marked as Last Click for different orders.
First Optin
The last tracked marketing click before the customer's first opt-in.
Re-Optin
The last tracked marketing click before a subsequent opt-in.
A single click can represent more than one of these events. When that happens, multiple labels appear on the same click.
These labels represent what actually happened in the customer's journey. They are historical markers and do not change based on the attribution model selected elsewhere in Wicked Reports.
They can be especially useful when auditing attribution because you can see the clicks that would be important under different attribution approaches.
For example, you can identify:
- The click that originally introduced the customer.
- The click immediately preceding an opt-in.
- The click immediately preceding a purchase.
- Marketing interactions that occurred between those events.
Understanding Time Between Events
Between timeline entries, Customer Explorer displays how much time elapsed.
For example:
Same day
1 Day
12 Days
These gaps make it easy to see conversion lag within an individual customer's journey.
Instead of simply knowing that a customer purchased, you can see how much time passed between their marketing interactions and eventual conversion.
Filtering the Journey by Channel
The channel filter above the timeline lists every channel appearing in the customer's tracked clicks.

Select a channel to show or hide its clicks.
Use Select all to restore every channel.
Use Clear to deselect all channels.
The channel filter only affects clicks.
Important customer events such as:
- Contact Created
- Orders
remain visible regardless of which channels are selected.
If all channels are deselected, the timeline displays:
No clicks match the selected channels.
Recently Viewed
After you've opened at least one contact, Customer Explorer displays Recently Viewed.
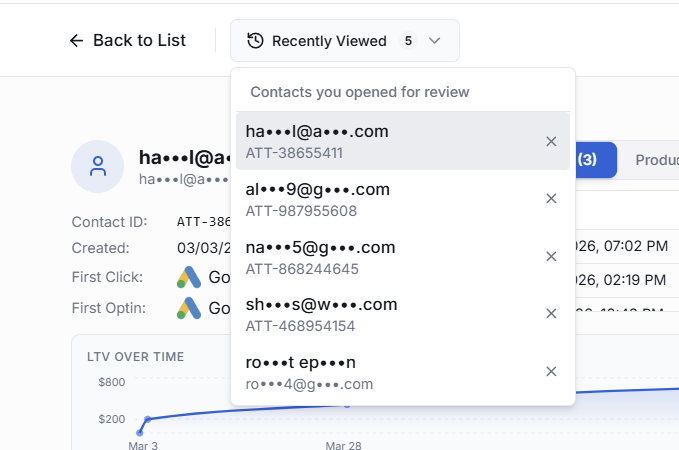
Recently Viewed lists contacts you've opened for review during your current session.
Each entry includes the contact's:
- Name
Select a contact to return directly to their Contact Details.
Select the × beside an entry to remove it.
Recently Viewed Is Not a Saved Segment
Recently Viewed is a browsing convenience.
It does not create a customer segment, audience, report, or saved list.
On Contact Details, Recently Viewed can also be used to move directly between contacts you've recently investigated.
Privacy and Customer Information
Customer Explorer contains individual customer information, so Wicked Reports applies privacy controls based on user permissions.
For users without admin privileges, customer:
- Names
- Email addresses
are masked throughout:
- Customer Explorer
- Recently Viewed
- Contact Details
If customer information appears masked, this is an intentional privacy control and does not indicate missing customer data.
Timezone and Currency
Dates and times throughout Customer Explorer use the account timezone configured under:
Settings → Company
Currency values use the account currency configured under:
Settings → Display
These settings help keep Customer Explorer consistent with the rest of your Wicked Reports account.
Frequently Asked Questions
Why don't Customer Explorer numbers match Meta, Google, or another ad platform?
Customer Explorer shows the individual records Wicked Reports has tracked.
Advertising platforms use their own tracking and attribution methodologies, so their reported numbers may differ from Wicked Reports.
Use Attribution Report when you want to evaluate aggregated channel, campaign, ad set, ad, or keyword performance.
Use Customer Explorer when you want to inspect the individual contacts, orders, and clicks behind your Wicked Reports data.
Why is a channel blank or shown as —?
An em dash means Wicked Reports did not receive UTM information for that touchpoint.
Customer Explorer intentionally does not automatically classify these touchpoints as "Other."
An occasional blank can occur depending on how a customer reached your site. Repeated blank values may indicate that marketing links aren't consistently passing the expected UTM parameters.
If you see a pattern of missing source information, review the tracking links used by that marketing source.
Why can't I find a contact I know exists?
Check both your date range and the tab you're searching.
The Contacts tab filters customers by their Create Date.
For example, suppose a customer was first created six months ago and purchased yesterday. Searching yesterday on the Contacts tab will not return that person because they weren't created yesterday.
Their purchase can appear under Orders for yesterday.
Also check your active filter chips to make sure another filter isn't excluding the contact.
Why can't I find an order when I can find the contact?
Contacts and Orders use different event dates.
A contact appears on the Contacts tab based on when they were created.
An order appears on the Orders tab based on when the purchase occurred.
Switch to Orders and select a date range that includes the Order Date.
Why is Customer Explorer taking a while to load?
Large date ranges and high-volume accounts can contain a significant number of individual records.
Customer Explorer streams records into the table as they're received, so you can begin working before the complete dataset finishes loading.
Look for:
+ still loading…
beside the result count to determine whether more records are still arriving.
For faster investigation, consider narrowing the date range.
Can I filter while Customer Explorer is still loading?
Yes.
Rows stream into the table as they're loaded, and you can begin reviewing and filtering them immediately.
Your result count may continue changing until loading is complete.
Why are customer names and emails hidden?
Customer names and email addresses are masked for users without admin privileges.
This is an intentional privacy control.
It does not indicate a tracking or customer-data problem.
Why doesn't today appear in my date range?
Today's data is still being collected and processed.
Customer Explorer date ranges intentionally end at yesterday so that an incomplete current day isn't presented as though it were final.
Why doesn't changing the date range update my data?
Selecting a new date range does not automatically reload Customer Explorer.
After choosing and confirming the range, select Fetch Data.
The new Contacts, Orders, and Clicks data will then begin loading.
Why is an order amount lower than the amount in my shopping cart or ecommerce platform?
Contact Details uses net order amounts.
Applicable discounts, refunds, credits, chargebacks, cancellations, and returns are removed.
As a result, the amount shown in Customer Explorer can be lower than the original gross order total.
Why don't I see products for a customer?
Product information is only available when Wicked Reports receives product-level data from the customer's integration or from data sent to Wicked Reports.
Not every integration provides this information.
Missing product information does not necessarily mean the customer's order is missing.
What do First Click, Last Click, and First Optin mean in the customer journey?
These labels identify actual historical points in the customer's tracked journey.
First Click is the customer's first-ever tracked marketing click.
Last Click is the last tracked marketing click before an order.
First Optin is the last tracked marketing click before the customer's first opt-in.
Re-Optin identifies the last tracked click before a later opt-in.
These labels describe what occurred in the journey. They are not recalculated based on the attribution model you're currently viewing.