Intro to Custom Conversions via HTTP POST
When you want to record a Custom Conversion into a Contact's customer journey, there are a few possibilities to accomplish this: CSV, HTTP Post, Zapier, or API. This article focuses on uploading Custom Conversions via HTTP Post.
Here are some examples of when you would want to upload a custom conversion:
- Scenario 1 - Custom Event
Case: You want to track how many people converted from any given marketing campaign to a nonpurchase event. In this case, you would use the Conversion Type of UNATTRIBUTED_CLICK. - Scenario 2 - Booked Meeting
Case: You want to track how many people (and who) booked a meeting, along with what ad platform was responsible for driving them to convert. In this case, you would use the Conversion Type of MEETING. - Scenario 3 - In-Person Demos
Case: You want to track how many people (and who) had an in-person demo with you and then see if those individual demos led to future sales. In this case, you would use the Conversion Type of LIVE_EVENT_DEMO.
You can also learn more about custom conversions in this help doc. Now, let's take a look at how to format your Custom Conversions for HTTP Post.
How to Format Custom Conversions for HTTP Post
When preparing your Custom Conversions for HTTP Post, you'll want to make sure you've added all the required fields and formatted them correctly. If you have not prepared your HTTP Post properly, you will, most often, receive an error message and you'll need to correct the error before the HTTP Post can pass through. In this section, we'll cover:
- The URL Endpoint
- The Required Headers
- The Body's Required Key-Value Pairs
- The Body's Optional Key-Value Pairs
- An Example HTTP Post with JavaScript
The URL Endpoint
To send Custom Conversions to Wicked, use the URL:
https://api.wickedreports.com/clicks/<client name>
You will need to replace <client name> with your client name in your account. See this help doc to find your client name.
The Required Headers
The only required header is Content-Type. It should be as follows:
- Content-Type: application/x-www-form-urlencoded
The Body's Required Key-Value Pairs:
- Email: Email of the lead for the conversion.
- Date_Time: This is a Date/Time setting to create the conversions against. You can use “NOW” for the current date/time or any date/time using this format: mm/dd/yyyy hh:mm am/pm
- Timezone: Timezone of Date/Time provided. This would be the timezone your CRM is using, NOT the Timezone of the Contact.
-
- Examples: EST Timezone="UTC-5”, CST Timezone="UTC-6, MST Timezone=“UTC-7”
- Infusionsoft uses EST (UTC-5)
- If you are using a PresetOveride EXISTING_LEADS or ORDER_LAST_CLICK, you can use "UTC-0"
- Timezones change with Daylight Savings Time. For example, EST (Eastern Standard Time) is UTC-5 part of the year and UTC-4 part of the year. If you are setting up an automation that will run continuously, you will need to be aware of this and make sure your automation updates when Daylight Savings Time occurs.
- Source: The name of The Event
- Content: The name I want my Column Header to be called in Wicked Reports
- ConversionType: The type of conversion being sent to Wicked.
The valid options are:- UNATTRIBUTED_CLICK
For example, you have a custom conversion that you'd like to send to Wicked Reports but do not know which conversion type to select. Choose this one, as it's ideal for most use cases. - HUBSPOT_MEETING
For example, you want to track how many HubSpot meetings you've had, who you have them with, and what campaigns drove this event conversion. - MEETING
For example, you want to track how many meetings you've had, who you have them with, and what campaigns drove this event conversion. - DOWNLOAD
For example, you want to track how many downloads you've had, who downloaded them, and what campaigns drove these users to download. - WEBINAR
For example, you want to track how many webinar submissions occurred, who submitted them, and what campaigns drove this event conversion. - CHAT
For example, you want to track how many chats were initiated, who initiated them, and what campaign drove them to initiate a chat.
- UNATTRIBUTED_CLICK
-
- LIVE_EVENT_DEMO
For example, you want to track how many live event demos were scheduled, who scheduled them, and if those individual demos led to purchases down the road.
- LIVE_EVENT_DEMO
The Body's Optional Key-Value Pairs:
- IP_ADDRESS: The IP address of the user
- TimeOffset: The number of minutes to subtract from CLICK TIME.
- Example: If you know there is a 20-minute delay between when the click is created and when you want it to appear delayed, use 20 as your TIME OFFSET.
- Term: additional event info
- Medium: additional event info
- Campaign: additional event info
- OrderID: This field can be skipped. It is not needed for custom conversions.
- WickedId: This field can be skipped. It is not needed for custom conversions.
- WickedSource: This field can be skipped. It is not needed for custom conversions.
Now that you've added all the required fields and formatted them correctly, you can go ahead and send your custom conversions to Wicked!
Example HTTP Post with JS Snippet:
https://jsfiddle.net/wickedivan/uf5zv12a/
An Alternative Method:
In addition, in case your CRM doesn't provide an easy way to send your data to Wicked, you can now send the custom conversion data as part of the URL query string.
Here's an example URL showing how to send your data using the query string:
https://api.wickedreports.com/clicks/<client name>?Source=Hubspot&Content=Application&Date_Time=NOW&Timezone=UTC-5
Note: You cannot send the email as part of the query string but it should be sent via POST method.
How to Review Custom Conversions in Wicked
To ensure your custom conversions have passed into Wicked properly, you'll want to check out the API Verification Page.
The API Verification Page will allow you to see all the custom conversions that have passed into your Wicked Reports account. It pulls in fresh data every 30 minutes. So, you can send your custom conversion through, then come to this page to verify it's been received.
Simply change your filters, and look for your custom conversion.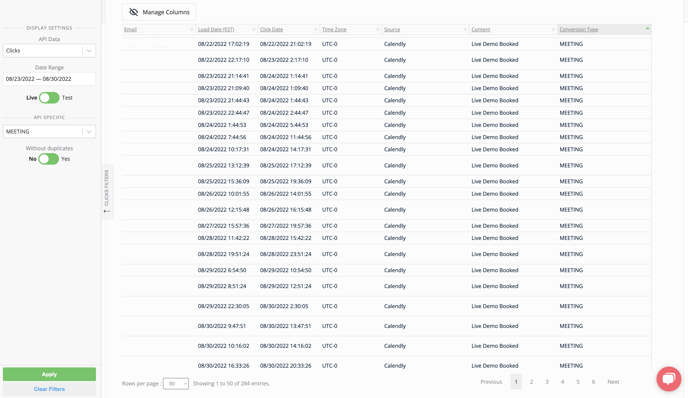
- If you see the custom conversion on your API verification page, then we've received it.
- If you do not see your custom conversion on the API verification page, that means an error has occurred and we have not received it. Please update the error before re-submitting.
That's it! You've now completed your custom conversion upload. If you'd like to learn more about your custom conversions, such as how to see if your custom conversion has been processed, and where to view your custom conversions in Wicked Reports, then visit the Custom Conversions article for all that and more!
If you have any questions regarding custom conversions, then please review the FAQs below. If you find you still have questions after reading the FAQs, then reach out to the Wicked Reports support team via live chat, or by sending an email directly to support@wickedreports.com. We're always happy to help!
FAQs:
- I'm getting a "Content-Type" error. What should by Content Type be?
Content-Type should be “application/x-www-form-urlencoded”.